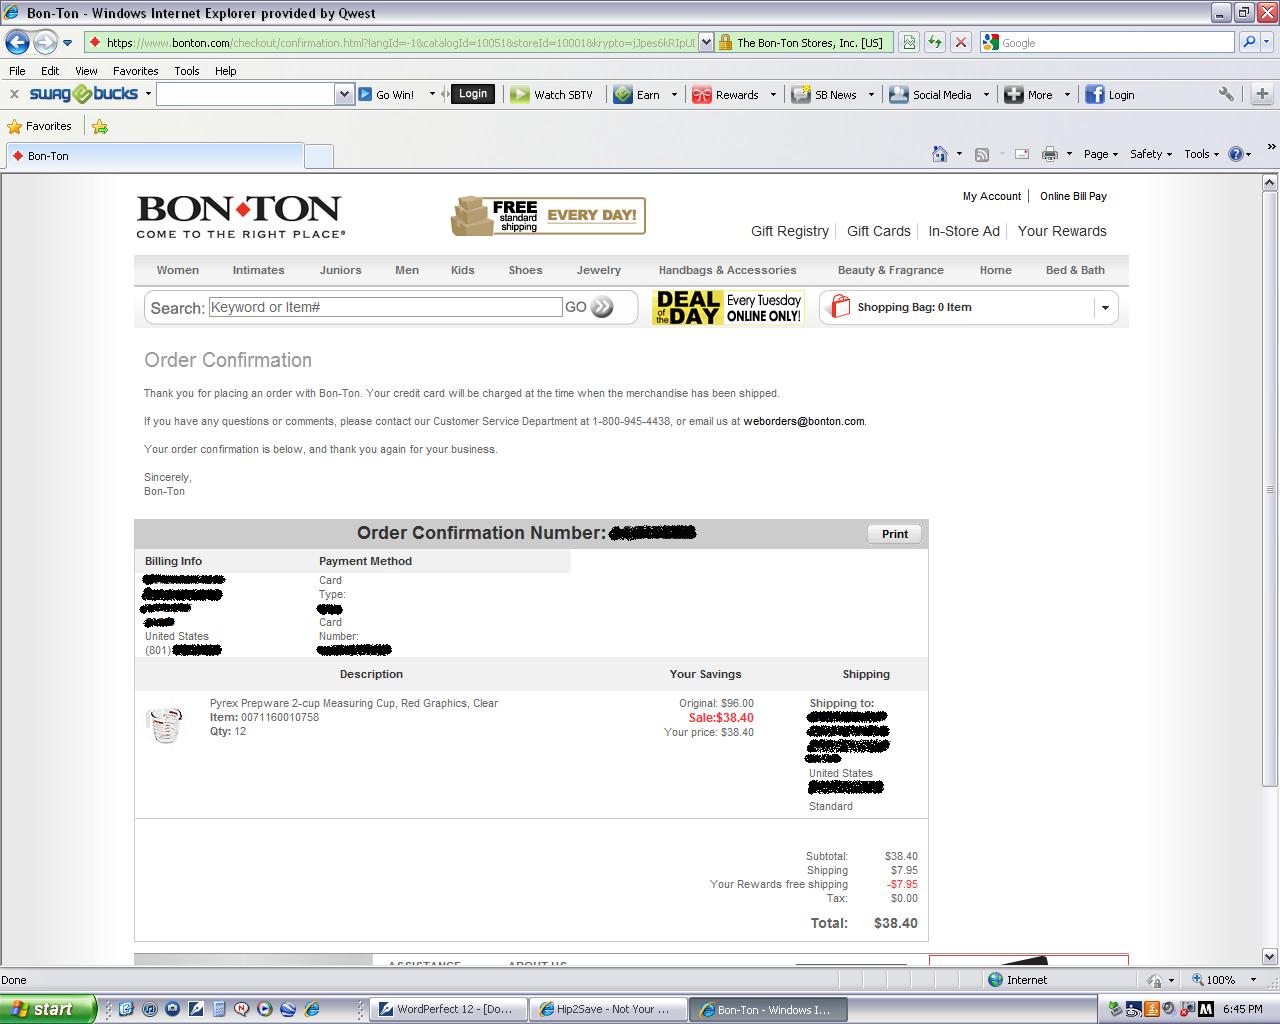
Hey everyone! Hip2Save had a great deal on Pyrex glassware posted on her website today. Click HERE to check out the details (60% off and free shipping!). As soon as I saw this I knew I had to act quickly. You see, earlier today I went on my weekly K-Mart shopping trip (for my previous thoughts on K-Mart click HERE). Anyway, they had some great toys on clearance with an additional 50% off! I was able to snag some LIV dolls and accessories for my girls for their Easter baskets for an amazing price (I think they ended up being $6.00). I also purchased some odds and ends to have at home for when the kiddos are invited to birthday parties as well as some items for Christmas. Yes, Christmas. I have often been asked why I would do this considering that I don't know what my girls will ask for. That is true. However, I know my kids, I am their mom after all, so when I see something I know they will like I purchase it throughout the year. When the season finally arrives I let Santa take the credit for getting them the other items that were just what they wanted. It always seems to work out great and I've never had any problems with my system. Now, back to my point of this post. This shopping trip got me thinking about what I would give out to my co-workers this year. I had an idea to give some measuring cups filled with Hershey's Kisses and a tag that says 'I hope your holiday season is filled with JOY beyond measure!' The only problem, I hate cheap measuring cups and the good ones can be quite pricey. That's why I was so happily surprised by this great deal on nice Pyrex measuring cups. Is it fate that this was the same day I had been thinking about these gifts? I think so! Anyway, I just saved oodles of money acting on this now. And, when it comes time to finally hand these little babies out I will be able to enjoy the season instead of stressing about what I'm going to give. Sounds good to me! Sorry, to my lovely friends who read this blog and will end up receiving these, I hope you'll forgive me!
Tuesday, April 12, 2011
Friday, January 7, 2011
WASHING You a SOAPER Happy Birthday!
Last week when I was doing my after-Christmas Christmas shopping I saw the cutest packs of washcloths at Kohls. All 8 washcloths were bundled up in a cute little ribbon for $4.00 making them $.50 a piece. I knew at that price I'd be able to make some cute something or other out of them and suddenly I thought of cupcakes. Yesterday I went to dinner and a movie for my friend Michelle's big day so I hurried and whipped one of these up to give her. I also had some Bath and Body Works soap that I had snagged at a great price and put them together in a gift bag. I was so excited to put my theory to the test and I am
Step 1: Fold the washcloth you will be using as your frosting with both sides to the center:
Step 2: Fold the washcloth in half:
Step3: Roll it up on an angle! It's better if it's a little loose so you can finagle it later:
Step 4: Fold the washcloth you will be using as the cake in half:
Step 5: Then fold it in thirds...this makes it kind of bulky:
Step 6: Wrap the cake washcloth (with the folded side on top) around the bottom of the frosting washcloth (with the folded side on the bottom). I really hope that makes sense:
Step 7: Take a large, clear plastic ponytail (see it on my thumb in the picture above?) and wrap it around the top of the cake washcloth:
Step 8: Turn down the layers of the frosting washcloth until you are happy with the results. Tuck the bottom layer into the clear rubber band:
Step 9: Decorate your cupcake! I used a very light duty spray adhesive and regular cake sprinkles. Have your sprinkles ready to use! I very, very lightly sprayed the washcloth and immediately sprinkled my sprinkles. I couldn't take any pictures while doing this because you need to do it so quickly. After the sprinkles I took a red pom pom and sprayed the adhesive directly on it then placed it on top:
Step 10: Tie your choice of ribbon around the cupcake to cover the ponytail, attach a tag if you'd like and presto! You have your own zero calorie cupcake:
Oh, and by way of disclaimer, make sure you tell the recipient to WASH the washcloths before using! lol. If you don't use a heavy duty adhesive and only a little there shouldn't be any problem. I tested it out and it washed out just fine.
Thursday, December 30, 2010
An Ornament Wreath...
Hey everyone! I hope you all had a wonderful Christmas. My Christmas celebrations were stretched out over about 4 days and then I've been back at work so I'm sorry it's taken me so long to finish all my Christmas stuff. But hey, it's still December so it's okay to be talking about Christmas right? I wanted to show a few more things that I made this year. Mostly what I gave to some of my family and friends. If you happen to follow the Maple and Vine Craft Club posts you'll know we made Ornament Wreaths in December. I absolutely loved mine but I have no where to put it. Literally, I have no space. I know a lot of decorating fanatics like to replace their stuff all the time but for some reason I don't change mine around that often. I guess I get really attached to what I like and have a hard time changing it. So, what I usually do is give stuff away to people so I can still see it every once in a while. Maybe I'm weird but it makes me happy to know I helped make someone else's home a little prettier...I wonder if that makes me a decorating stalker. Hhmmm....I just might have a problem. Anywho, I ended up giving my wreath to my sister. I can't wait to see it on her door next year!
and Silhouettes...
I mentioned in an earlier post that I had figured out a new way to make something that was not a new idea. I was referring to the silhouettes I made. In keeping with my uber-cheap Christmas I still wanted to make something that was classy and nice. I made two sets of these: one for my parents (who have everything and are hard to buy for) and one for my girls dad and step-mom (I have no idea what they would like so I figure I'm always safe sticking with things related to the kids). I only took a picture of one of the sets (and unfortunately I think the second set turned out better because I had better frames) and next time I will definitely not take a picture with the glass still in the frame...that glare/reflection is a nightmare! Sorry, I'm rambling, back to my "original" idea on how to make these. I didn't want to have to deal with finding a projector. I saw some ideas where people took a picture, printed it, cut it out and even painted that. Because mine were going in a 5 X 7 frame I knew I could skip quite a few steps by just using my computer screen. After taking the girls pictures against a plain wall I simply pulled up the picture on my computer, sized it to a 4 X 6 size (so there would be some space around their profiles when in the frame) taped a piece of plain paper to the monitor and traced away very lightly. I then took my profile cut it out and traced them again onto black cardstock and cut them out again. It really was super easy. I then used my new laser printer (Christmas gift to myself! lol) and printed their name and the year to finish it off. I'd say they took less than an hour to make all 3 and depending on the frames you buy the cost can be around $5.00 a piece. I loved them and I also think they would make great Valentine's Day presents which is right around the corner.
Wednesday, December 22, 2010
A Cut Above
I was going to hand out different gifts to my co-workers but when I stumbled across these scissors at only $0.25 a piece (woot woot!) I just couldn't pass them up. It is a little bit of a different idea but everyone was so excited to get them. You know how it is...you go to use your "good" scissors only to discover your little ones (should that include husbands too? lol) have used them on something which has ruined them for life? Yeah, I think we've all been there. Wrap it in jute (my fav) with a little tag and they are perfect. So simple and easy.
Here's a close up of the tag in case you want to use the same saying...
Tuesday, December 21, 2010
Cute Christmas Gift Ideas for Groups
If anyone is in need of a few last minute ideas here are some of the things I've been busy working on.
Rudolph Pops:
On to the details....for my neighbors and teachers in my church I made Cinnamon Roasted Almonds. Yum. These will make your house smell amazing. Nuts are always on the expensive side but I bought mine from the bulk food section at Win-Co and only spent about $16.00 for 4 pounds. They ended up making about 12 one cup (plus a little extra) servings. They are super easy to make, but they do take a little time for the baking. Don't worry, you can make some cute cones to serve them in while they're in the oven.
Whisk 1 egg white with 1 tsp. cold water until frothy.
Stir in 4 cups of almonds until they are well coated.
In a different bowl mix together 1/2 cup brown sugar, 1/2 cup granulated sugar, 1/2 tsp. salt and your desired amount of cinnamon. I like cinnamon so I add about 2 tbsp. of it but I've seen some recipes with as little as 1 tsp. When the dry ingredients are mixed, add to the almonds stir until they are well coated with the sugar mixture.
Lightly spray a cookie sheet with oil and spread the almonds out to a single layer as much as you can.
Bake at 250 degrees for 1 hour to 1 hour and 20 minutes (depending on how crunchy you want them) stirring every 15 minutes or so. I baked mine for 1 hour and 20 minutes. After they are finished baking let them cool and then store in an air tight container.
Because I was giving mine away, while they were baking I made the cones for them to go in. I've never made cones before and it was kind of a pain in the you-know-what to figure it out. But, once I figured it out it wasn't as bad. First I had to come up with a template for the size of cone I wanted to make. I'm not sure what to call this. A rounded diamond perhaps? The curved part will actually end up being straight when in the cone shape.
After I had the template I cut 12 of them. Use your favorite adhesive on one side of the cone.
Roll into a cone shape making sure your adhesive is sticking. This was the trickiest part.
You'll notice I'm using plain, cream paper for my cones. That is because I used really pretty cellophane I found at Hobby Lobby. If you're using my measurements for the cones you'll need to cut a 12 x 16 piece. If you're making a different sized cone you're on your own. lol. Oh, and I'm sorry about the lighting glare....it was a cloudy, rainy/snowy day and I had to have my lights on in the house. I didn't realize they would show up as much as they did.
Add a little bit of adhesive to the bottom two corners.
Place your cone on an angle to begin rolling the cellophane. Tuck the bottom corner around the back of the cone and roll as tightly as you can so the cones stay together well.
Fill the cone with one cup, plus a little more to top it off, of the cooled, roasted almonds.
Tie the cellophane with ribbon and if you want attach a tag and voila! You have a great gift for a fraction of the cost if you purchased these in the mall. By the way, my tag says "You're getting NUTTIN for Christmas except our best holiday wishes!"
I made the Rudolph Pops for my youngest daughter to take to her daycare. I was able to make about 30 of them for around $12.00 and the kids loved them. I got the idea for the Rudolph Pops from The Idea Room. If you want to make them click HERE and follow her instructions (why type up the same steps eh?). I do have a few thoughts though.
1) DO NOT skip the adding peanut butter step. I was hoping I could and I ended up breaking a lot of cookies.
2) I cut up the ends of Hot Tamales just because I wanted the nose to seem a little more "bulb" like.
3) You're going to end up with lots of pretzel crumbs. Hang on to them so you can use them in a recipe you have calling for chopped pretzels...a crust perhaps?
4) I didn't think attaching the pretzels was that hard. I just dipped the end of the pretzel in the chocolate and then balanced them on the end of the cookie (while the chocolate was still soft) and they hardened together just fine.
5) We had leftover pipe cleaners at my house and used them to wrap the bags and make little bow ties for Mr. Rudolph.
Aren't they cute?
Monday, December 6, 2010
Post-It Pizzaz!
Sorry for the lack of blog posts lately. We have been taking turns getting sick at my place (I think we're on week 6 or 7 but at this point I've lost track) which makes for a very tired mom. However, this past week most of us have been feeling much better and we tackled the Christmas presents my girls wanted to take to their friends at school. I can't believe I'm not procrastinating for once! You see, I had been trying to think of an idea that would be keeping with my super frugal Christmas this year and hadn't found anything I thought would fit in that category. Even little gifts that only cost a dollar a piece add up when you're giving to lots of people. Luckily, while I was at work a few weeks ago my boss had a cute little post-it note holder thingy that I had never seen before and knew they would make the perfect gift for cute little girls. I wasn't blogging at the time but back in July I scored 15 pads of Post-It notes for only $1.20ish (yes for ALL of them) and they've been taking up space in my closet just begging to be used. Because I already own a crazy amount of scrapbooking and craft items I only had to actually buy 1 thing (magnet tape....keep reading) for $4.00 after a 50% off coupon was used at a local craft store. We ended up making 10 holders so they average .40 cents a piece.....can't beat that! Alright, are you sick of my rambling yet? Here's how you make em... but feel free to tweak away to your hearts desire!
Cut cardstock to measure 3 1/4 by 9 1/2 inches and score the WRONG side of the card stock at 2 3/4 - 3 1/4 - 6 1/4 and 6 3/4 inches. Bend into shape where you scored the cardstock.
Using a permanent scrapbook adhesive attach the back of the post-it note pad to the center of the cardstock. Make sure you have your post-its in the direction you want them when it opens up.
Attach what you want to keep the little buggers closed. My boss' had velcro but I didn't like the idea. Assuming these are going to be opened often to use all of the post-its I didn't want the velcro to get scraggly like it can sometimes. I thought magnets would work well but didn't want the bulk they would add. But to my utter surprise I found the solution in magnet tape! Didn't even know such a thing existed! The downfall, I discovered, is that you do have to use a fairly large piece to get it to stay closed which I was a little bummed about but in the end I figured I'd still rather have them flat when closed.
Carefully place up the magnets so they line up but aren't showing when closed.
Embellish the tops however you would like! We kept ours simple
Then we wrapped them up in some jute, printed a little tag for each girl and we were good to go!
My girls handed them out today and apparently they were a huge success! I also started working the gift we are giving to my parents. It's not a new idea but I do think I figured out a unique way of making them so I'll try and have that post up soon too!
Subscribe to:
Posts (Atom)